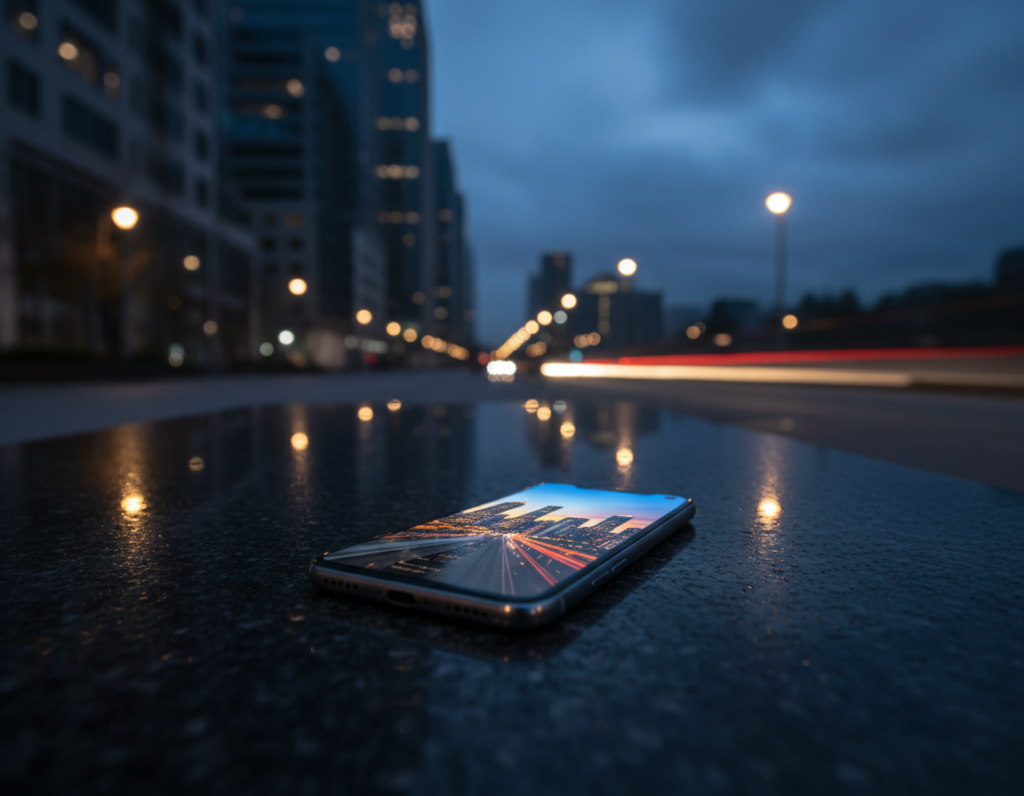
Moving lights—headlights, taillights, neon signs and cyclists with LEDs—create scenes that test a phone camera far more than daytime shots. In low light a phone must choose: longer exposures that cause blur, or higher ISO that adds noise. This trade-off shapes what your final image can look like.
The eye sees steady streaks and bright dots, but a camera must collect photons over time. Any subject movement during that window becomes blur. Computational blending can help by fusing frames, yet it cannot beat the physics when lights move fast or change.
This guide tackles the core conflict: do you freeze action and accept noise, or embrace creative light trails and blur? You will learn why shots fail, how to set up a smartphone right, choose shutter and exposure, stabilize, and add light on purpose.
Practical, repeatable techniques here apply to most modern phones sold in the United States, not brand gimmicks. For deeper context on sensor effects and image quality, see this analysis from DxOMark.
how a larger sensor affects image
Why phone night photos of moving lights fail in the first place
Street lights and passing cars create abrupt contrasts that phone cameras struggle to record cleanly.
Low light trade-offs: exposure versus ISO
Exposure time pulls in photons but records any movement as blur. Increase shutter time and streaks grow; shorten it and the image stays dark.
Higher ISO makes the scene brighter, yet adds visible noise and softens fine detail. For most handheld shots, you must pick which flaw you can tolerate.
Highlights and crushed shadows
Small bright points like headlights clip quickly on a phone. When highlights blow out, the rest of the scene can sink into crushed shadows with little recoverable detail.
Mixed light and white balance shifts
Different light sources—sodium lamps, LEDs, neon—pull color in opposite directions. Auto white balance may change between frames, producing odd skin tones and inconsistent images.
Night mode stacking limits
Night mode averages many frames to cut noise and raise brightness. If lights or people move, stacking causes ghosting, double edges, or watercolor artifacts.
- Symptoms: blurry headlights, smeared taillights, blotchy shadows, strange colors.
- Mindset: decide whether to freeze action, protect highlights, or keep ambience—then pick settings and technique to match.
Set up your smartphone camera for cleaner night photography
A small setup change on your device can make the difference between noisy snaps and clean, usable images. Prep first and you’ll save editing time later.
Shoot RAW for better editing flexibility
Shoot RAW when available. RAW files keep more color and shadow data so you can recover detail in dark areas and tame blown highlights during editing.
Use the main 1x lens for low light
The primary camera usually has the largest aperture and best sensor readout. Avoid ultra-wide and digital zoom after dusk — they amplify noise and soften dark details.
Turn off flash to preserve ambient light
Keep flash off by default. Built-in flash flattens scenes and wipes out the mood that street lights and signs provide. Let existing light shape the image.
- Pre-shoot checklist: clean the lens, enable RAW, confirm 1x main camera, pick Night Mode or Pro mode.
- Consistency tip: use the same lens and capture format for a series so editing yields matched images.
mobile sensor limits night motion photography: settings that control motion blur
Deciding between a fast shutter or a long one is the first creative step for any successful low-light street shot. Your choices shape whether lights freeze as points or sweep into trails.
Shutter speed decision tree:
- Fast shutter (1/250–1/60s) to freeze headlights and crisp details.
- Slow shutter (1/15–5s or longer) to paint light trails and add atmosphere.
- Try one of each: one that freezes action and one that embraces streaks, then pick the better story.
ISO strategy: keep ISO moderate (around ISO 400–800) when ambient light suffices. Raise ISO if you must shorten the shutter to stop moving lights, and plan to reduce noise in editing.
Use slight underexposure or exposure compensation to protect bright lights. It’s far easier to lift shadows than to recover clipped highlights from streetlamps or signs.
White balance lock keeps color consistent across a series, especially under mixed LEDs and sodium lamps. Lock it before a run of shots to avoid shifting tones.
Night Mode vs Pro mode: use night mode for handheld static scenes; switch to Pro/manual when you need set shutter times, repeatable exposures, or control over trails.
For stars, follow the 500 rule: 500 ÷ focal length gives a maximum shutter time in seconds. When testing, shoot and zoom in to check for blur, and keep exposures conservative (≤30s) for sharp points.
Stabilization and technique for sharp night images in real scenes
Stability turns a risky handheld shot into a crisp long exposure that retains ambient light and detail. Use steady support and simple capture habits to lower ISO, lengthen shutter time, and keep highlights clean.
Tripods, mounts and found support
Practical tools matter: compact tripods, clamp mounts, or a small Gorillapod make long exposure work. For quick setups, use a ledge, backpack, or fence post and lean the smartphone against it so it cannot slip.

Prevent tap shake
Use a 2–10 second timer, a Bluetooth remote, or the volume button to fire the shutter. These tiny steps stop micro-shake right as the exposure starts.
Focus lock and bracketing
Tap to focus on a high-contrast edge, then lock focus so the camera does not hunt in the dark. Shoot brackets and repeat shots: traffic and exposure processing vary, so take several photos to guarantee one clean frame.
Compose for depth
Place lights and reflections to create depth. Use wet pavement or windows to multiply light sources, control shadows to separate the subject, and frame the scene so foreground and background balance the image.
- Quick tips: steady support, anti-shake release, focus lock, bracketed exposures.
- Why it works: more stable shots allow longer exposures and lower ISO, improving clarity and reducing noise.
- Repeat often: this technique yields better photos under changing light.
Use light on purpose: ambient sources, phone flashlight, and creative lighting
Use available scene light as your foundation, then add a controlled phone beam to shape faces and foregrounds. Start by exposing for street lamps, signs, and shop windows so the scene keeps its mood.
Directional keying without killing ambience
Hold the flashlight off to the side so it acts like a key light. This creates depth and keeps shadows, unlike a direct on-camera flash that flattens the scene.
Handle hard light, hotspots, and color shifts
Angle the beam to avoid bright spots on skin or reflections. Increase distance or bounce off a surface when possible.
If the flashlight color looks cool or green, lock white balance or fix it later in editing. Reduce saturation selectively to tame odd casts.
Light painting and boosting usable light
For long exposure, gently sweep the beam across the foreground for a few seconds to reveal detail without making the scene look like daytime.
To get more usable light: move the phone flashlight closer first, then widen aperture if your phone supports it, and only after that raise ISO carefully to limit noise.
- Quick tips: use ambient sources first, add side flashlight, check hotspots, paint slowly during long exposure.
- More help: try this practical guide for setups on how to use a phone as a key light: phone flashlight techniques.
Conclusion
Successful evening captures depend on control: steady support, chosen exposure, and careful editing make the difference. Phones struggle when light is low and subjects move, but deliberate settings and stabilization clean up most problems.
Focus on three levers: choose shutter speed to set motion or trails, protect highlights with exposure, and balance ISO to manage noise. Trust Night Mode for handheld static scenes; switch to Pro/manual when you need repeatable results with moving lights.
Shoot RAW when possible, lock focus and white balance, and use a tripod or found support. Decide whether you want frozen action or intentional trails, then commit to that look and practice with test photos to refine your camera settings and editing workflow.