Night scenes reward choices. Streets, cars, and signs become energy when you plan exposure, ISO, and stabilization.
This guide shows how to use manual or Pro controls on your phone to make controlled trails, blur, and zoom while keeping key structures sharp. You will learn a simple workflow: prep → settings → stabilization → capture → edit.
Phones must trade between longer exposures and higher ISO. Longer shutter speeds give smooth trails but can blur static details. Higher ISO brings brightness at the cost of noise.
We’ll cover tripod long exposures and handheld approaches so you can shoot on the street with what you have. Expect tips on using RAW, stabilizing gear, and selective overrides of auto processing.
Editing priorities: noise control, highlight protection, and color balance so motion stays readable. For practical pre-shoot techniques, see a compact list of street tips for shooting after dark.
Why motion effects look so powerful in urban night scenes
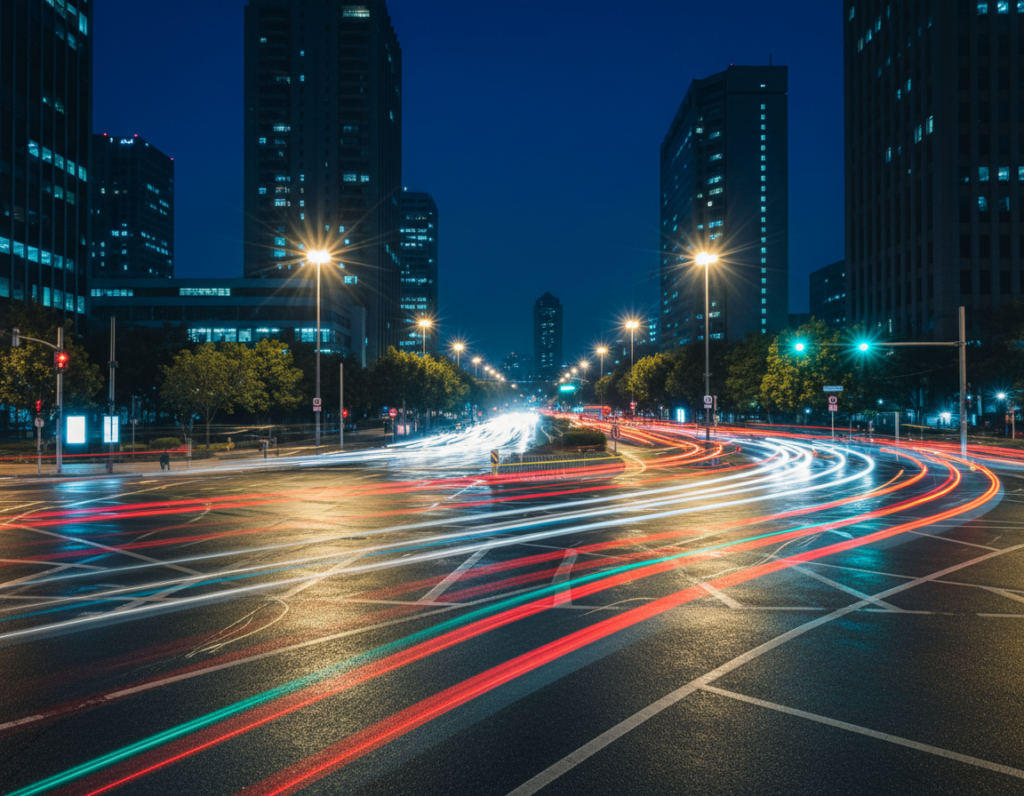
In urban settings after dusk, moving lights and people become compositional strokes across a stable backdrop.
How phones see low light: longer exposures vs higher ISO
Phones collect less light as the sky darkens. To compensate, the camera either lengthens the exposure time or raises ISO gain. Longer exposure lets moving highlights draw streaks, but it can blur everything if the phone or subject moves.
Higher ISO brightens the frame instantly but adds noise and reduces color fidelity. Both choices change how motion appears in the final image.
What “dramatic motion” can mean
- Vehicle trails: long exposure turns headlights and taillights into clean ribbons.
- Intentional blur: move the subject or camera to render motion as soft streaks while keeping anchors sharp.
- Multi-frame stacking: Night mode blends several frames; it improves shadows but can smear moving subjects if not stable.
Mixed lighting and color casts
Cities mix sodium, LED, and neon sources. Automatic white balance jumps between frames and can change the scene’s color mood. Bright lamps clip highlights quickly while deep shadows hide texture, which is why many pros underexpose slightly and recover detail later.
Use manual controls for consistent results: predictable exposure and locked settings give you the best chance to capture clean streaks and sharp architecture in low light.
Prep your smartphone camera for low-light success
Getting settings and gear ready first gives you repeatable results under mixed lighting. A short pre-shoot routine keeps you from chasing unpredictable auto processing and blown highlights.
Quick checklist:
- Clean the lens and secure a stable support (tripod, clamp, or ledge).
- Enable Pro/Manual mode or install an app that lets you set shutter and ISO.
- Turn on shoot raw if available to preserve more data.
Shoot RAW for more shadow detail and flexible white balance
Shoot raw files hold extra shadow and color data. That lets you recover shadows and fix tricky white balance later without degrading detail.
Choose the right lens: why the main 1x camera usually wins at night
Use the main 1x lens when possible. It often has the largest aperture and best sensor, so your files are cleaner than ultra-wide or digital zoom crops.
When to skip flash to protect ambient city glow and depth
Avoid flash: it flattens depth and overpowers the scene’s background lighting. Only use a muted flash for subject fill when you want a clear foreground and still keep the city tones.
Plan stability early so your manual exposure choices work. Repeatable prep leads to consistent photos every outing.
Manual settings for dramatic motion light effects smartphone night photography
Start with a clear decision: pick the look you want—subtle blur, short streaks, or long ribbons—then set the core camera controls to match that choice.
Shutter timing in seconds
Set shutter first. For subtle blur try 0.5–1 seconds. For visible trails use 2–8 seconds. For continuous ribbons consider 10+ seconds when your phone is fully stabilized.
ISO strategy for cleaner images
Keep ISO moderate—about 400–800 as a field guide. Lower ISO reduces noise and keeps color truer. If you can stabilize the phone, prefer longer shutter times over higher ISO.
Exposure control in bright streets
Slightly underexpose to protect highlights. It’s easier to lift shadow detail from RAW than to recover clipped streetlights or neon. Use exposure compensation last, after shutter and ISO.
Lock focus to stop hunting
Tap a high-contrast edge at the subject distance and lock focus. This prevents hunting during multi-second exposures and keeps anchors sharp across the scene.
Set white balance for mixed urban lighting
Use manual white balance to match tungsten, sodium-vapor, or neon mixes. Consistent white balance keeps a cohesive color palette across a series of shots.
Night Mode note: Night Mode can help handheld static scenes, but avoid it when intentional blur or long shutter times are the goal unless the phone is secured and locked down.
- Choose the motion look.
- Set shutter (seconds) first.
- Set ISO moderate, then protect highlights with exposure compensation.
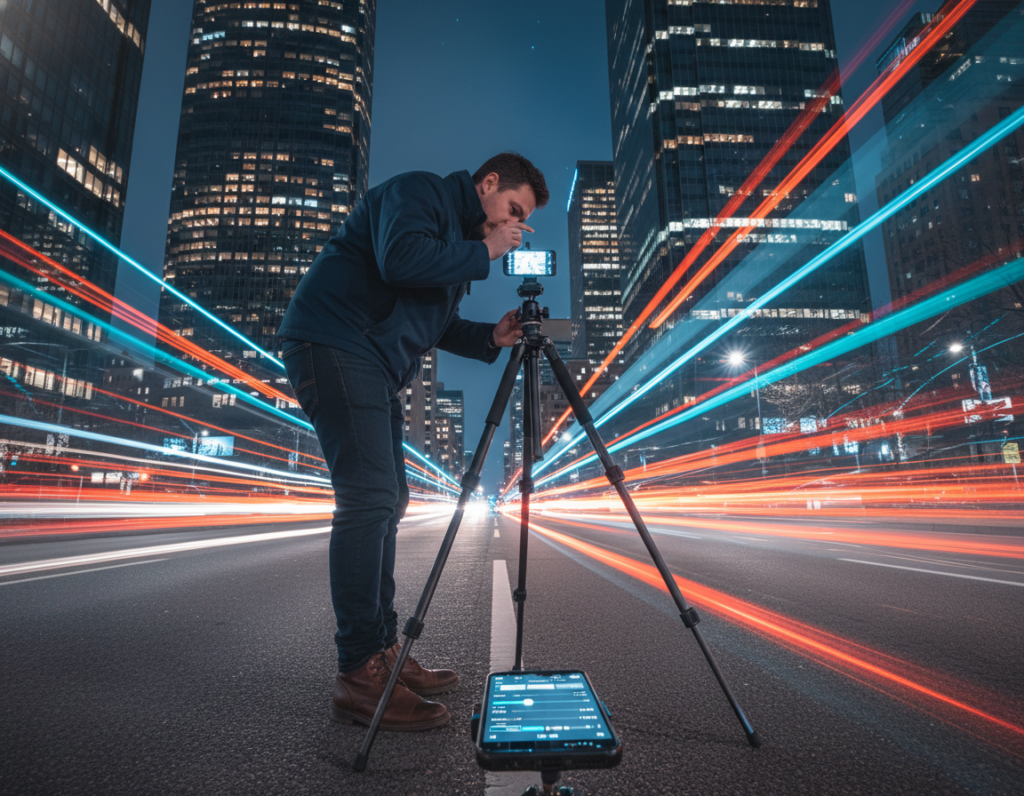
Stabilization: the non-negotiable step for sharp long exposures
Stability is the practical keystone that unlocks multi-second exposures with usable results. With steady support you can use longer exposure time and lower ISO to get cleaner files and truer color. This is the way to make moving highlights read as clean streaks while the city stays crisp.
Tripods, mini tripods, and mounts that unlock multi-second shots
Carry a compact tripod, mini tripod, clamp mount, or a flexible Gorillapod-style support. These small tools let cameras and phones hold still for several seconds and free you to dial slower shutter time for better results.
No tripod? Brace and improvise
Use ledges, railings, a backpack wedge, or a wall as a stable spot. Wedge the device, set focus, then re-check framing. This simple playbook often beats a shaky hand.
Prevent tap shake
- Use a 2–3 second self-timer for the simplest fix.
- Trigger with a volume-button on wired earbuds or a Bluetooth remote when available.
- Use a smartwatch shutter or voice trigger for hands-free control.
Night Mode stacking and a quick stability check
Note: Frame stacking in Night Mode fails if the phone drifts. Misaligned frames smear bright spots and ruin the intended look.
- Take a short test shot at your chosen time and zoom in to inspect detail.
- Adjust the support, lock focus, then retest before committing to longer exposures.
Stabilize first, and your photos will show clear city anchors while moving light draws readable lines across the scene.
Capture urban light trails that read clearly in the final image
Pick spots where predictable traffic flows will draw readable streaks through your frame. Scout intersections, overpasses, curves, and crosswalks that shape car paths into clean lines.
Positioning and timing: shoot when traffic matches your goal. For continuous ribbons wait for steady flow; for separated streaks choose lighter traffic. Be patient and take multiple attempts to catch clean passes.
Keep the city sharp while lights move
Compose with static anchors—buildings, signs, bridges, or curbs—to give the moving lights context. Use foreground elements like rails or sidewalks to add depth without cluttering the trails.
Balancing brightness and retaining shadows
Underexpose slightly to protect lamps, headlights, and neon from clipping. It’s easier to lift shadows in post than to recover blown highlights. Preserve enough shadow information to keep pavement texture and architectural detail.
Quick review checklist after each shot
- Check for highlight clipping on lamps or headlights.
- Confirm trail brightness is consistent across the frame.
- Verify edge sharpness on stationary objects and background anchors.
- Scout the spot.
- Match traffic density to the desired shot.
- Underexpose slightly, then review and adjust exposure and balance.
Creative motion effects beyond trails: zoom bursts and handheld blur on purpose
Try controlled zooming or deliberate camera drift to turn bright urban points into painterly streaks. These approaches let you move beyond simple trails and shape a unique look for your images.

Zoom bursts create radiating lines from bright signs and lamps. Use optical zoom if available; otherwise use a lens that changes focal length or an app that simulates zoom. A good starting range is 2–5 seconds so the streaks form without blowing out highlights.
How to do a zoom burst
- Stabilize the phone and lock focus and exposure.
- Set the shutter to the 2–5 seconds range as a baseline.
- Start the exposure, then smoothly zoom in or out to draw lines from bright centers.
Intentional camera movement (ICM) tricks
ICM is a controlled pan, twist, or short drift during the shutter interval. Move with purpose so blur reads as style, not shake.
- Targets: neon clusters, bright storefronts, and symmetrical street lamps work best.
- Shoot quick series and adjust speed, direction, and time until the look fits your intent.
- On-site, check if the lines help composition. If they distract, simplify the background and try again.
“Small, repeatable gestures during exposure make abstract but readable images.”
Practice these techniques with test shots. Experimentation leads to repeatable tricks that improve your photos and images over time.
Use light sources like a pro: ambient, artificial, and phone-flashlight techniques
Treat the city like a portable studio: combine ambient sources with a handheld beam to sculpt foreground form. Use ambient lamps as the base, then add a small directional flashlight to emphasize texture, faces, or architectural detail without overpowering the scene.
Directional placement for depth and texture
Off-axis placement (to the side) brings out surface texture and relief. A beam from slightly above models a subject naturally and avoids odd under-chin shadows.
Place the flashlight farther back for a rim spot that separates subject from background. These simple placements add perceived depth and help your composition read in low contrast situations.
Subtle light painting during long exposure
For long exposures, make gentle, sweeping passes with the flashlight. Keep movements soft and avoid direct hits to bright surfaces so the pass looks integrated, not staged.
- Lock exposure and focus.
- Use 2–8 seconds and move the beam slowly.
- Review and repeat, refining speed and distance.
Reflections on wet streets and puddles
Wet pavement and puddles double color and add drama to compositions. Position the flashlight to accent a puddle’s edge or a glossy sidewalk to amplify neon and warm street tones.
Avoiding hotspots and harsh shadows
Small beams can cause specular blowouts and hard shadows. Soften by keeping the flashlight moving, angling it, or increasing the distance. Feathering the beam across the subject reduces obvious spots.
Flashlight versus on-camera flash
Flash is often flat and can wash out ambient glow. A handheld flashlight lets you shape lighting in ways a direct flash cannot. If color shifts appear, shoot RAW and correct white balance later. Avoid mixing multiple phone flashlights unless you plan to fix color casts in post.
“Use the city as your kit—ambient sources set the mood; a handheld beam sculpts the story.”
Editing for clean, vibrant night photos with motion effects
Smart processing preserves the scene’s energy while reducing noise and protecting highlights.
Start with a clear order: noise reduction, then white balance, shadow/highlight work, and finally local contrast and sharpening.
Noise reduction without losing texture
Apply noise reduction selectively. Target shadow areas more than midtones and highlights so you keep texture and avoid smeared detail.
Use lower-strength NR on areas with fine grain and stronger NR where grain hides detail, like deep shadows.
Correct color casts and keep mood
Set a base white balance for the frame for consistent color across images. Then use local masks to tame extreme neon or sodium casts without flattening the scene’s balance.
Recover shadows, protect highlights, and sharpen selectively
Lift shadows enough to reveal structure but keep true blacks to avoid a gray look. Pull down highlights so streetlights and signs stay readable and avoid blown blobs that ruin exposure.
Sharpen static anchors—buildings and signs—more than streaked areas so the eye finds the intended focal points.
Export for web and print
- Export max-resolution TIFF or high-quality JPEG for prints.
- Use high-quality JPEG (sRGB) for web sharing and lower compression for portfolio images.
- Well-shot phone files have printed successfully at Artbeat Studios, proving good technique yields print-ready image results.
Common mistakes in manual night shooting and how to fix them fast
Many problems during long exposures come from simple choices you can correct on the spot. Use this quick checklist to diagnose why a shot failed and how to rescue the next one.
Why did this fail? Quick fixes
- Auto over-brightened the frame: Auto modes often clip highlights and add heavy processing. Fix: switch to manual exposure, underexpose slightly, and protect highlights in RAW.
- Wrong lens or digital zoom: Ultra-wide or digital zoom adds noise in low light. Fix: use the main lens for cleaner detail and lower ISO.
- Focus hunting during a long exposure: The camera refocuses and blurs the shot. Fix: tap a contrast edge and lock focus before the exposure.
- Over-editing problems: Halos, crunchy sharpening, and oversaturated signs ruin mood. Fix: dial back global sharpening, use local masks, and reduce saturation on problem tones.
- Unstable footing or unsafe location: Wobbly support and risky spots create bad frames and risk. Fix: pick stable ground, stay clear of traffic lanes, keep gear close, and use a short timer or remote.
Practice for consistent results
Repeat the same settings across two or three compositions, review the files, and tweak one control at a time. This steady way of working builds reliable results faster than changing everything between shots.
Conclusion
Good low-light photos come from choices you make, not the device you hold. Prep the camera, pick a shutter time that matches your goal, stabilize, then capture. Edit to control noise and keep color consistent.
Keep the city sharp and let moving elements form the design. Use streetlights, headlights, neon, and reflections on water to add impact. Protect highlights, keep believable shadows, and preserve detail where it matters.
Practice the workflow on a single spot: take a couple of test shots, tweak exposure and framing, then run a short series. Urban after-dark work rewards patience—traffic, signs, and sky change—so stay flexible and learn from each shot.