, This guide shows how to capture clean, continuous glowing lines from moving cars with just your phone and a steady setup.
Our goal is simple: get smooth, unbroken light trails with a crisp urban backdrop. Smooth means continuous lines from headlights and taillights, with buildings or bridges in focus for contrast.
What matters most is stability, timing, and exposure control. A steady mount and the right long-exposure mode beat the newest device. You will learn how to lock settings and pick moments when traffic moves in clean waves.
Next, we preview a clear workflow: phone setup, safe spot selection, dialing exposure, shooting technique, and optional stacking or edits to build denser trails. Expect real constraints like mixed street color and limited manual controls, and always choose legal, stable viewpoints for safety.
What light trails are and why long exposure makes them look smooth
Light trails are a form of time exposure that records motion across several seconds instead of one instant. With a stabilized camera, moving points create continuous lines while fixed elements stay crisp.
Time exposure and how movement is recorded
When the shutter stays open, the sensor sums incoming brightness over time. A single passing headlight or taillight becomes a drawn line because the source moves while the exposure runs.
How headlights and taillights form visible trails
White or yellow headlights and red taillights make two-tone trails that show direction and flow. Use contrast between static buildings and flowing lines to emphasize motion.
- Long exposure creates continuous trails from steady traffic.
- Short exposures lead to broken or dotted trail results.
- Overexposure blows highlights; wrong white balance muddles color.
What smooth streaks require
Smooth results need enough exposure time, steady traffic, and a locked frame. Keep the background sharp while letting the moving sources blur into graceful arcs.
Tip: Stabilize the phone, choose consistent flow, and test shutter speed to balance blur and clarity before shooting the final run.
Smartphone setup and essential gear for stable long-exposure shots
Start by checking your phone’s exposure controls to ensure multi-second captures are possible. Confirm you have a built-in long-exposure or a Pro/manual mode that lets you set shutter time, ISO, and focus. RAW capture is a plus for later edits.
Phone capabilities to verify
Look for a night or long-exposure setting or a Pro mode that shows shutter time. If the app shows seconds, you can plan for proper trails.
Tripod fundamentals
A sturdy tripod and a solid phone clamp are essential. Multi-second exposures magnify micro-movement, so even small wobble softens buildings and ruins clean lines.
Hands-free triggering
Use a 2–10 second self-timer or a Bluetooth release for hands-free shots. A remote shutter release speeds iteration and reduces shake during each take.
Stabilization, flash, and lens basics
Turn off flash and avoid touching the device while the shutter runs. Wipe the lens clean and remove thick cases that cause vignetting or reflections.
Battery and storage prep
Charge fully, bring a power bank, and clear space for many multi-second images. Long exposures drain battery and generate heat—close background apps and take short breaks between runs.
- Equipment checklist: tripod, clamp, remote or timer, spare power, free storage.
- Test one or two frames to confirm settings before committing to a long sequence.
- If an app warns about anti-shake, improve mount stability instead of raising ISO.
Finding the right city location and timing for stronger light streaks
Pick locations where movement and background combine to tell a clear story. A good location pairs steady traffic with visible context such as skyline shapes or familiar buildings.
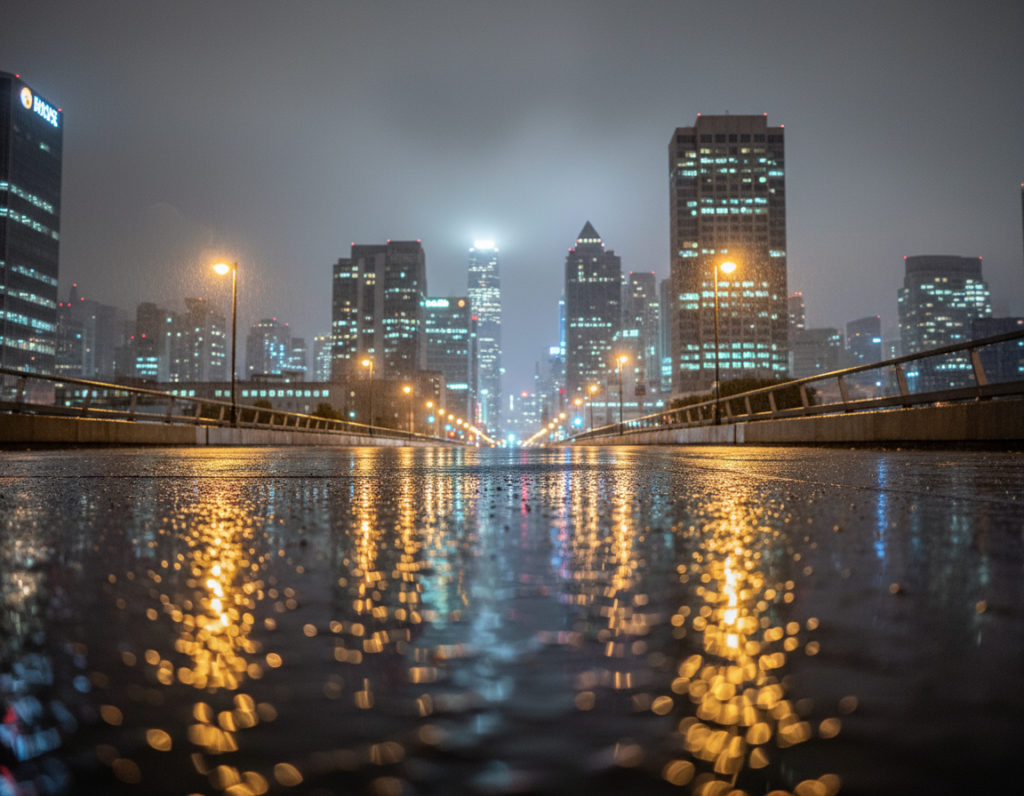
Best elevated vantage points
Bridges, overpasses, rooftops, and parking decks show traffic patterns and create sweeping leading lines. These spots reduce clutter from parked cars and reveal curves and flow that make dynamic shots.
Street-level options
At street level, choose a corner with architectural interest or an illuminated sign as a clear point of interest behind the road. Use lane markings to form intentional lines through the scene.
When to shoot and traffic tips
Blue hour keeps sky color while full night gives maximum contrast so streaks pop. Curves yield S-shaped trails; intersections layer multiple directions and create dense bursts when traffic releases.
- Scout roads with steady flow and visible landmarks.
- Press close to glass, angle the phone, and block reflections with a jacket; a polarizer helps when available.
- Stay legal and safe: use sidewalks, approved lookouts, and stable mounts; avoid medians and busy lanes.
vehicle light streak photography smartphone city night settings that work on real roads
Getting usable long exposures on busy roads is about sensible settings and small adjustments.

Shutter speed targets
Start points: try 2–6 seconds for moderate, close traffic; 8–15 seconds for steady flow; 20–30 seconds for distant highways or denser trails.
Choose seconds based on speed and distance: fast cars near the frame need fewer seconds, while slow or far traffic benefits from longer shutter time to draw continuous lines.
ISO strategy
Keep ISO as low as possible (100–200) to reduce noise and protect detail in buildings. Raise ISO only if you must shorten exposure because of wind or to keep blue-hour color before it fades.
Focus and manual mode
Tap-focus can hunt. Use manual focus or focus lock on a contrasty object at road distance to keep the scene consistent across multiple frames.
Manual mode lets you lock shutter, ISO, and focus so every take matches your test shot.
Exposure control and color
Protect highlights by lowering exposure/EV until bright lights keep shape, then extend shutter rather than pushing brightness.
Shooting RAW helps recover blown areas and fix mixed white balance later. For daytime trails, add an ND filter so the camera can use a slow shutter speed in bright conditions.
- Baseline settings concept: 2–6s, 8–15s, 20–30s.
- Change one variable at a time: shutter speed first, then ISO, then exposure comp.
- For more tips, see photograph light trails.
How to capture the shot: step-by-step technique for clean trails and sharp city detail
Begin with a clear plan: fix the frame, level the horizon, and choose a building or bridge as an anchor so the moving lines lead to a point of interest.
Compose first
Lock framing and set focus on the chosen structure. Use the road as a leading line so passing cars draw attention toward the subject.
Start the exposure at the right moment
Watch the traffic rhythm and trigger slightly early to account for any self-timer delay. That places the brightest part of each shot where you want it.
Patience, repetition, and creative control
Shoot multiple photos at different shutter times to vary trail density. If streetlights look blown, lower exposure or reduce ISO to keep points crisp.
Advanced stacking option
Keep the phone fixed and take a sequence of identical exposures. Combine them in Photoshop or GIMP using the Lighten blend mode, or try StarStax for a quick merge.
- Setup tripod, clean lens, and choose viewpoint.
- Compose, lock focus/exposure, and use hands-free triggering.
- Review results, then change one setting at a time.
Troubleshooting: thin trails need longer shutter or more traffic; soft buildings mean better stability or a timer; blown highlights require lower exposure or ISO.
Conclusion
Mastering this approach means combining steady support, exposure control, and careful timing. Light trail photography turns routine traffic into graceful trails while keeping the background crisp and readable.
Three key factors make consistent results: a stable camera mount, sensible shutter and exposure choices, and timing that matches real movement on the road.
Iteration is normal. Review each frame, tweak exposure or shutter, and reshoot until trails look continuous and highlights stay in check.
Build a short checklist for outings: tripod, hands-free trigger, clean lens, enough storage, and a safe legal spot with a clear point of interest.
Next step: pick one nearby location this week, shoot from blue hour into night, and compare images to learn which settings create your favorite trail look.