Goal: get cleaner, low-light images with less blur and less noise, using simple handheld methods people used on urban walks when they forgot support gear.
Expectations: low light forces slower shutter speeds and higher ISO. That can cause shake, motion blur, and grain. I’ll show when handheld still works and when it doesn’t.
This short workflow previews what you’ll do: (1) learn why night shots fail, (2) set camera mode and exposure, (3) stabilize using the environment, (4) use burst and timing, (5) stack frames to cut noise, then (6) finish with tight edits.
What “clean” means: controlled highlights, believable color under mixed city light, and minimal noise without turning the image into a smeared watercolor.
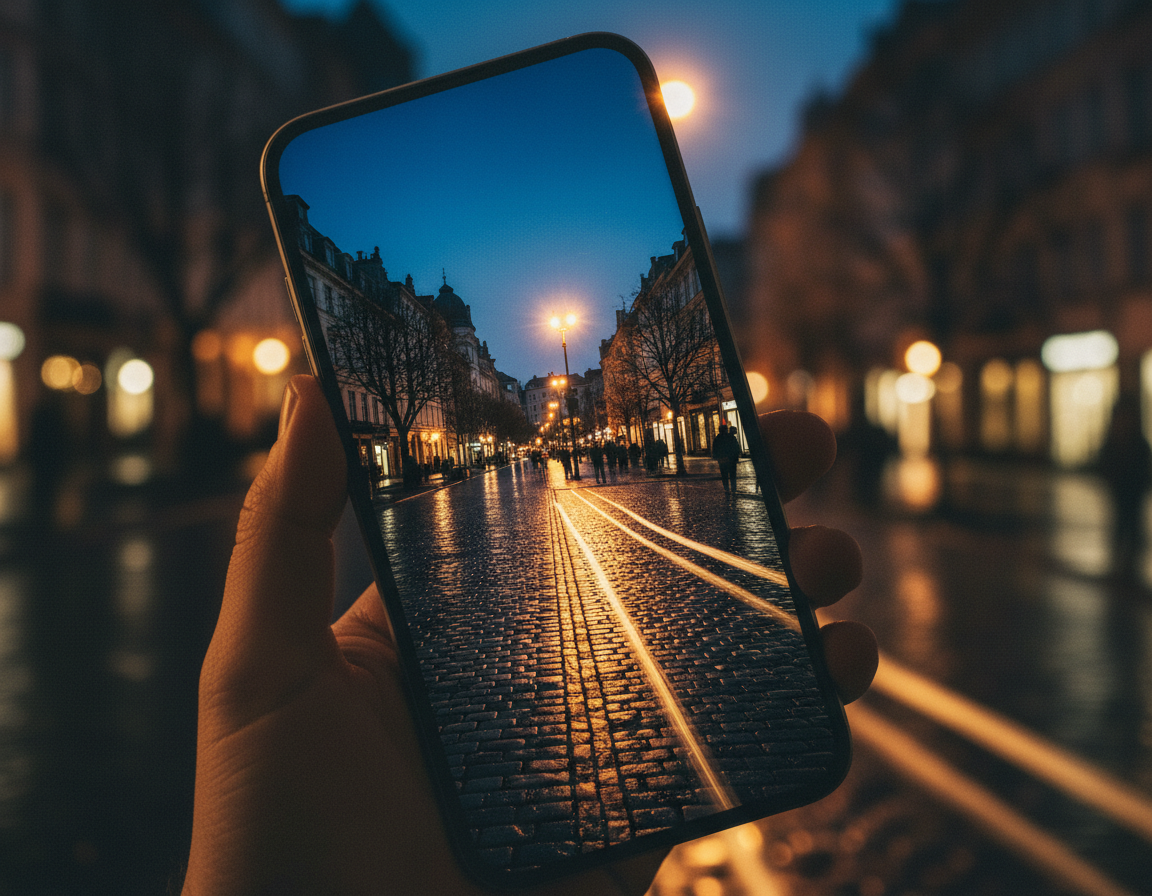
Urban objects often make the best support—walls, benches, mailboxes and the ground. For more field-tested ideas, see this practical guide on makeshift stabilization and tactics used on real night walks.
Promise: you’ll get simple shutter speed ranges and button habits that raise your keeper rate and help you use light to reduce ISO and improve focus.
Why Night Photos Look Blurry or Noisy on a Phone
C Most blurriness in evening scenes comes down to two mechanical issues: movement and missed focus.
Camera shake vs. subject motion: Hand movement during a long shutter lets the whole frame smear. Moving people or cars create streaks when they cross the exposure. Zoom in at 200% on bright points; streaking or halos along edges signals motion, not a failed sensor.
Focus failures: Phones often hunt in dim scenes because the scene lacks contrast. The lens may lock late or miss entirely, especially if the subject moves while the phone searches. That yields soft results even when you hold steady.
ISO, sensor limits and post work: High ISO forces the sensor to amplify signal and noise together. Aggressive post that lifts shadows or forces white balance makes grain and color casts worse. The easiest gains come from proper in-camera exposure and modest editing.
Quick diagnostic checklist
- Zoom to inspect bright points for streaks (motion) or blur (focus).
- Note shutter speeds: slower speeds increase shake and subject smear.
- Keep post adjustments conservative to avoid amplifying noise.
Set Up Your Smartphone Camera for Low Light Success
Begin by choosing the camera mode that gives predictable control over shutter and ISO. Start in the phone’s Night mode for stacked frames and better auto exposure. Switch to Pro or Manual when you need fixed shutter speed and ISO for moving subjects.
Pick the right mode and controls
Enable RAW/ProRAW if available. Turn on exposure compensation and the histogram or highlight warning. These tools help you protect bright signs while keeping useful midtones.
Use the widest lens and avoid digital zoom
Choose the main lens (usually 1x). It often has the largest sensor and best stabilization. Digital zoom crops the frame and boosts visible noise.
Expose in-camera and choose a shutter target
Protect highlights and aim for usable midtones so you avoid heavy shadow lifting later. If people move through the scene, pick a faster shutter. For mostly static scenes, you can accept slower speeds—practical handheld examples often land near 1/10s with moderate ISO.
- Set white balance reasonably to cut massive color shifts later.
- Balance exposure, ISO, and shutter before you press the button.
Clean night photos smartphone without tripod: Handheld Stabilization That Works
When light drops, how you stand and brace makes the biggest difference in keeper rate. Use body position, timed breathing, and urban props to cut visible shake and lift midtones without raising ISO.
Build a human tripod
Feet shoulder-width, elbows tucked, phone held with two hands and pressed to your chest or face. Keep wrists locked and avoid reaching out with extended arms.
Shoot on the exhale: inhale, settle, then gently squeeze the phone as you breathe out. This reduces small tremors during the exposure.
Use the environment as support
Brace on walls, poles, benches, stair railings, window ledges or a mailbox. Set the phone on a jacket or bag on the ground for low angles.
Try higher ledges or lower steps for creative framing while improving stability.
When to stop handholding
Handholding and shooting handheld can work for short shutter speeds, but once exposures push past about 1 second, use a solid support or tripod. If the scene forces long shutter speed to protect highlights, brace the camera and use a timer to eliminate tap-induced shake.
Burst Mode and Timing Tricks to Get a Sharper “Keeper”
A burst can boost your keeper rate when shutter speeds slip below about 1/60s. Tiny differences in hand movement mean one frame in a sequence will often hit the quietest instant and read as sharper.

Why rapid frames help
Burst works because small variations in movement change where blur lands. Capture 10–15 frames and the middle frames often show the least blur. This can still succeed down near 1/4s, but success depends on how well you brace and the subject’s motion.
How to press the shutter
Use a volume button or roll your thumb and keep pressure steady through the burst. First frames blur from the initial tap; last frames blur from release. Hold the phone steady and you’ll favor the middle frames.
Use timers and intervals
A 2-second self-timer removes tap-induced vibration for single shots. For ongoing movement, set an interval of ~2 seconds and capture 10–20 shots to pick clean frames or stack later.
“When possible, stabilize your stance and record a short burst—timing often trumps luck.”
- Practical recipe: fastest burst, solid footing, 10–15 frames.
- People strategy: interval bursts catch gaps in foot traffic.
Reduce Noise Without a Tripod Using Multi-Frame Stacking
If your base exposure can’t drop ISO enough, combining multiple handheld captures gives you a practical path to less noise. Stacking turns random sensor grain into a smoother result while keeping detail that heavy noise reduction often kills.
Capture rules: keep framing steady, shoot at least five images, and avoid big composition shifts. Choose scenes where the background stays mostly still and moving people cross frames.
Shooting reality and alignment
Even when shooting handheld, small shifts are correctable. Use steady footing and a short sequence. Auto-Align handles micro-movement so you don’t need a rig to benefit.
Simple Lightroom → Photoshop workflow
- Edit one frame and sync settings across the images in Lightroom.
- Open files as layers in Photoshop, Auto-Align Layers, then convert to a Smart Object.
- Apply Stack Mode → Median to reject outliers and reduce grain; moving people or cars often vanish.
Keep editing restrained: stacking works best when the exposure is already reasonable. Avoid aggressive shadow lifts and wild white balance shifts in post; those moves amplify color noise and blotches.
Conclusion
Close your shoot with three practical habits that improve keeper rates on evening walks.
First, set the camera mode and exposure that match motion in the scene. If people or cars move, favor a faster speed and accept more ISO. For static scenes, slow the shutter and brace on a wall or bench for steadier frames.
Second, use timing tools: a short timer, burst or a brief interval sequence will yield sharper results and give options for stacking. If ISO climbs, capture a series and use median stacking to reduce grain and remove passing subjects.
Practice regularly: try a single frame, a burst, and a stack at a local lamp or storefront. Compare results and note how your camera, settings, and support affect each shot.
For more low-light tactics and stabilization ideas, read this practical guide on mastering low-light tips low-light tips.