Photography at low light can look great inside an app and then degrade after you save. The core problem is simple: edits often reveal softness, noise, or muddy tones when the final file changes size or format.
This guide shows a clear way to keep as much original detail as possible. In practical terms, “without quality loss” means you protect fine textures, edges, and small lights while avoiding extra compression and color shifts.
Expect tips that match how people share in the United States — posting to Instagram, sending via iMessage, uploading to Google Photos, or printing small to medium prints. Your choices at export matter as much as sliders used during edits.
Follow the article flow: why detail drops, capture settings that help, an editing workflow that preserves pixels, and export settings that avoid throwing them away. The one golden rule is to protect pixels early and stop throwing them away later.
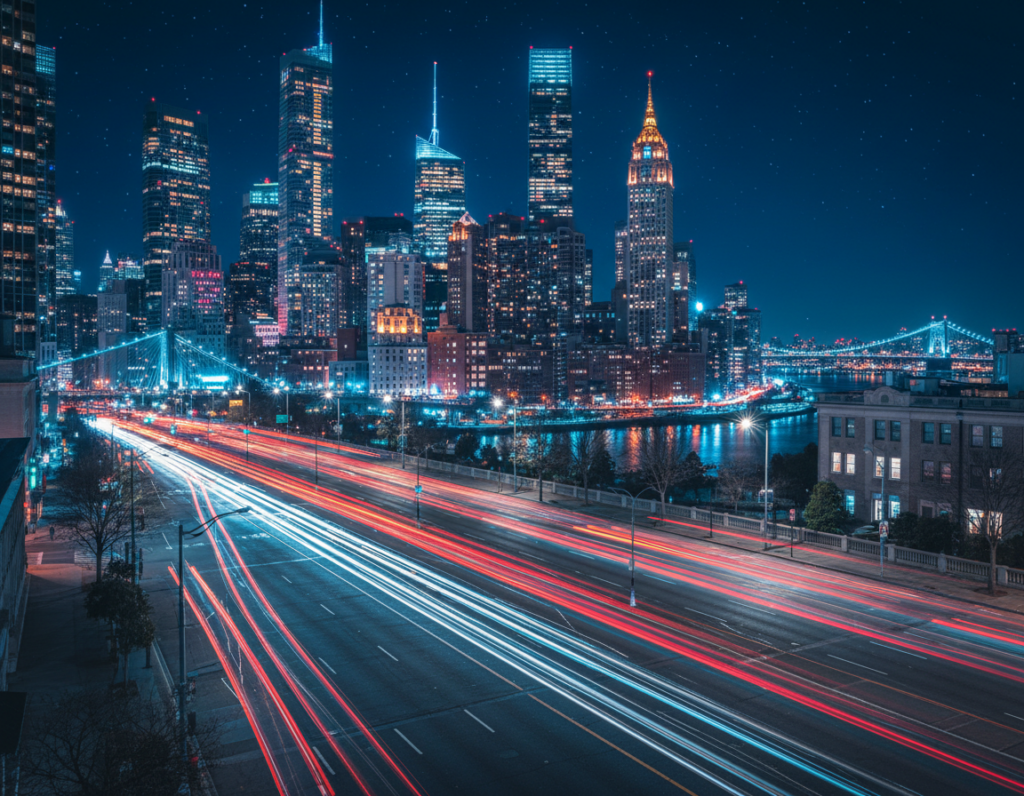
Why night photos lose detail on export from smartphone apps
When you move a dimly lit image out of an editing app, three hidden changes can make it appear weaker.
Resolution and pixels explained
Resolution is simply the number of pixels that make an image. More pixels mean more tiny squares of detail. A higher megapixel count helps when you crop, zoom, or print.
Compression artifacts vs. noise
Low-light scenes force the camera sensor to amplify signal. That raises ISO and creates speckled noise. JPEG compression, by contrast, can cause blocky smears, banding, or posterization.
Noise looks grainy and random. Compression creates repeating blocks and blur around edges. They are different and need different fixes.
Cropping, resizing, and hidden processing
Crop heavily and you throw away pixels. That is digital zoom after the fact and makes any later enlargement soft.
Some apps also apply hidden processing — extra sharpening or aggressive noise reduction — when saving the final format. Re-saving the same file in JPEG repeatedly compounds compression and kills fine detail.
- Three main causes: reduced resolution, added compression, destructive processing.
Capture settings that protect detail before you ever start editing
Start by capturing the best possible file. Edits help, but they cannot create pixels you never recorded. Set up the camera to save the most data and avoid losses later.

Shoot at the highest available resolution
Open your camera setting and choose the largest image size. Pick HEIF/HEVC or the “High Efficiency” option if it keeps file detail, or select “Most Compatible” when you need broad app support.
Choose RAW when possible
Raw files retain more highlight and shadow information than JPEG. Use iPhone ProRAW, Android Pro mode, or a third-party app to capture RAW and give yourself more headroom for exposure fixes.
Avoid digital zoom; frame in-camera
Digital zoom crops pixels. Move closer, change composition, or use an optical lens so the image keeps full resolution and fine texture.
Get focus and ISO right
Tap to focus and use focus lock when the scene is dim. Stabilize the camera to prevent soft shots.
Keep ISO as low as practical to limit noise. If needed, use Night mode or a tripod so you can use a lower ISO and protect sharpness.
- Mobile-first checklist: confirm max resolution, enable RAW if available, avoid digital zoom, lock focus, and keep ISO low.
- DSLR note: The same rules apply to a dslr — maximize resolution, manage exposure, and nail focus for cleaner files.
- Result: Better capture means fewer compromises later when you edit and save images.
Editing workflow that preserves the original image quality
A disciplined editing workflow keeps the original pixels intact while you make creative adjustments.
Non-destructive editing saves your changes as instructions, not permanent rewrites. That means the original file stays untouched and you can export multiple versions later.
Use Adobe Lightroom Mobile as a practical example. Import RAW or ProRAW when possible. Apply global adjustments like exposure and contrast first, then use selective tools for bright signs, streetlights, or deep shadows.
Practical adjustment tips
Avoid pushing shadows so far that noise explodes. Pulling highlights too hard can make lights lose shape or produce halos. Make small exposure steps and check results at 100% zoom.
Keep saturation and color moves subtle. Heavy vibrance can exaggerate noise and cause banding in skies. Preserve natural skin tones and warm city lights.
Sharpening, cropping, and versioning
Zoom to 100% before judging sharpening. Apply sharpening gently to avoid crunchy edges or amplified noise in dark areas.
Minimize heavy cropping to protect resolution and detail. Use perspective or straighten tools carefully to avoid unintended pixel loss.
Keep an edit master in the app and export copies for web or print rather than resaving the same file repeatedly.
- Import RAW/ProRAW when you can.
- Global first, selective next.
- Check sharpening at 100% and limit crop size.
How to export edited night photos smartphone without quality loss
Choosing the right final file and settings is the single best step to keep fine detail when you save an edited image. Decide based on the end use: web, client delivery, or print/archival. A clear decision tree makes the rest easy.
Pick the right format for the job
JPEG is lossy but efficient for web and social. Set the slider high (90–100) to reduce compression artifacts in dark gradients and shadow areas.
PNG and TIFF are lossless choices for archiving or print when apps support them. RAW remains a digital negative for further edits, not a final share format.
Size, resolution, and color
Keep full pixel dimensions when possible. If you must downsize for the web, pick a controlled width (2,000–3,000 px) rather than letting a platform resample aggressively.
Use sRGB for consistent color on most phones and browsers. For print, choose AdobeRGB or ProPhoto only if your lab or workflow supports wide-gamut profiles.
Sharing, copies, and app-to-app moves
Avoid screenshotting or saving over the original in a lossy format. Export once from your editor, keep that master, then share from the master file.
“Export a high-quality master, then upload or send that single file to prevent repeated compression.”
- Social/web: high-quality JPEG + sRGB.
- Client delivery: JPEG at 90–100 or PNG when needed.
- Print/archive: TIFF or high-quality PNG; keep RAW for edits.
Conclusion
The best way to keep fine texture is to treat the camera, app, and delivery as one continuous system.
Follow a repeatable checklist: capture at maximum resolution, avoid digital zoom, lock focus, and keep ISO low. Import RAW when you can, edit non-destructively, and export a single high‑quality master to reuse for different use cases.
Remember cause and effect: dim scenes amplify small flaws. A tiny resizing step, extra compression, or repeated saves causes visible detail decline faster than in daylight photos.
Quick troubleshooting: if a photo looks blurry, check resizing and sharpening; if it looks blocky, raise JPEG setting; if colors shift, pick sRGB for screens.
Practical takeaway for the mobile photographer: optimize each stage — capture, edit, and delivery — and compare in-app previews with exported files to confirm which settings preserve the most original detail.